How to Recover a Hacked Website
April 17, 2026
Why Your Website Looks Different on Mobile vs Desktop — Explained
May 6, 2026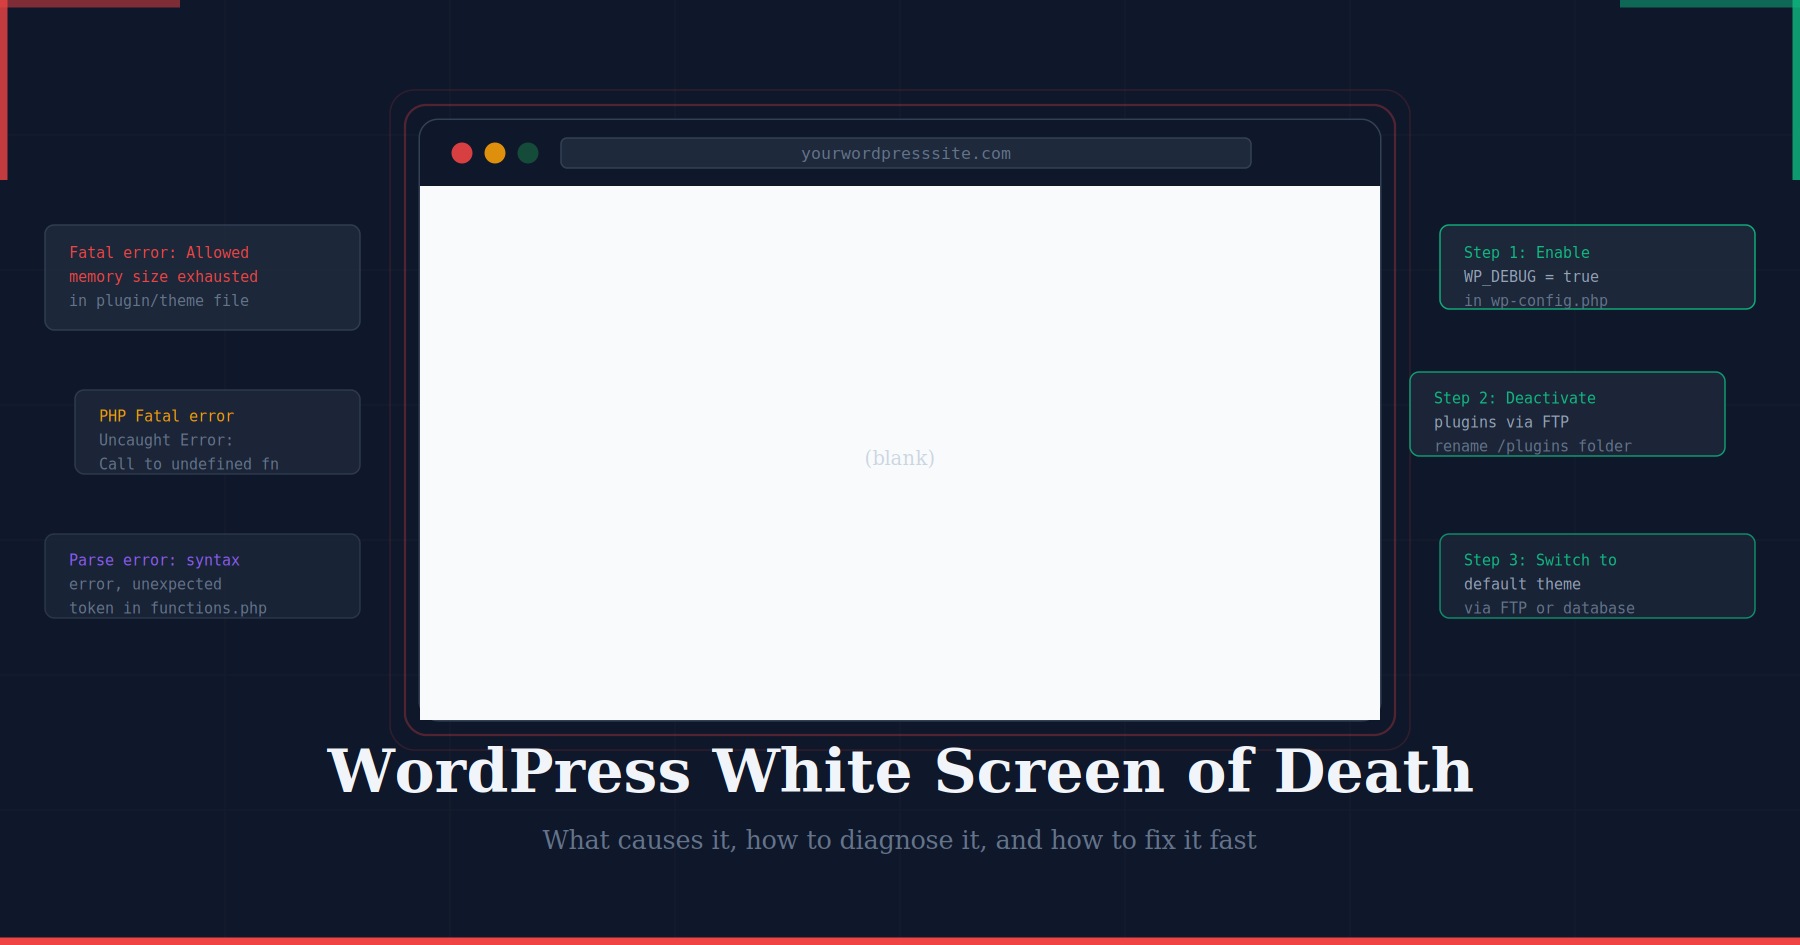
You open your browser, type in your website address, and instead of your homepage you see nothing — a completely blank white page. No error message, no heading, no content. Just white. This is the WordPress White Screen of Death, and it is one of the most alarming things a site owner can encounter precisely because it gives you so little to go on.
The good news is that the White Screen of Death almost always has a straightforward cause, and there is a reliable sequence of steps that will identify and fix it in most cases without needing to restore from a backup or call a developer. This guide walks you through everything: what causes it, how to diagnose it systematically, how to fix each cause, and how to make sure it never happens again.
What Is the WordPress White Screen of Death?
The White Screen of Death (WSOD) is the informal name for a blank white page that WordPress displays when a fatal PHP error occurs and error display is turned off — which is the default on most production sites for security reasons. Because WordPress suppresses the actual error message, all you see is the blank result of a crashed page load.
The WSOD can affect your entire site, just the admin dashboard, or just the front end — and the combination of what is affected gives you an important first clue about the cause:
- Entire site is blank — likely a plugin conflict, PHP memory exhaustion, or a corrupted core file
- Only the admin dashboard is blank — often a theme or plugin that is active only in the admin area
- Only the front end is blank — almost always a theme error, particularly in functions.php
- Only one specific page is blank — a plugin or shortcode on that page is failing
Common Causes of the White Screen of Death
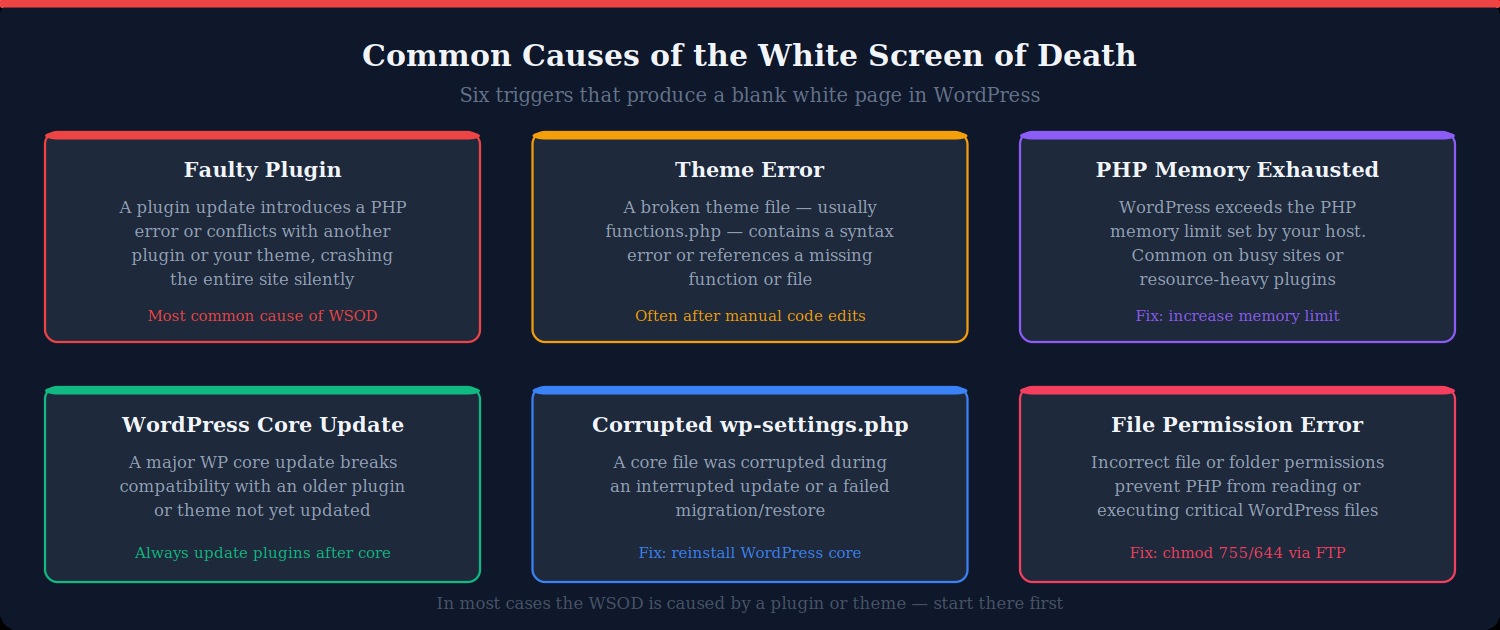
Faulty plugin
A plugin update that introduces a PHP error, or a newly installed plugin that conflicts with an existing one, is the single most common cause of the WSOD. Because WordPress loads all active plugins at startup, a fatal error in any one of them prevents the entire page from rendering.
Theme error
A syntax error or reference to a missing function in your theme’s functions.php file will crash the front end of your site. This is particularly common after manual edits to theme files — a single missing semicolon or misplaced bracket is enough to produce a WSOD.
PHP memory limit exhausted
WordPress and its plugins require PHP memory to run. Most hosting plans set a default PHP memory limit of 32MB or 64MB. Resource-heavy plugins — page builders, WooCommerce, caching plugins — can push usage past this limit, causing WordPress to crash with a fatal “Allowed memory size exhausted” error that displays as a white screen.
WordPress core update conflict
When WordPress releases a major version update, plugins and themes that have not been updated to match can break. This is especially common immediately after a major WordPress release, when some plugins lag behind in compatibility updates.
Corrupted core file
An interrupted WordPress update — caused by a server timeout, a network issue, or an upload error — can leave core files partially overwritten or corrupted. A damaged wp-settings.php or wp-includes/functions.php will prevent WordPress from loading entirely.
Incorrect file permissions
If file or folder permissions are set incorrectly — for example if a migration or server change leaves PHP files unreadable — WordPress cannot load the files it needs and produces a blank screen. This is less common but worth checking if none of the other causes apply.
Before You Start: Check Whether the Admin Dashboard Is Accessible
Before diving into FTP or server files, try accessing your WordPress admin dashboard at yoursite.com/wp-admin. If the admin area loads normally while the front end is blank, your problem is almost certainly theme-related and you may be able to fix it without touching FTP at all — you can switch themes directly from the Appearance menu.
If both the front end and admin dashboard are blank, you will need to work via FTP or your hosting file manager. Make sure you have your FTP credentials ready before proceeding.
Step-by-Step: How to Diagnose the White Screen of Death
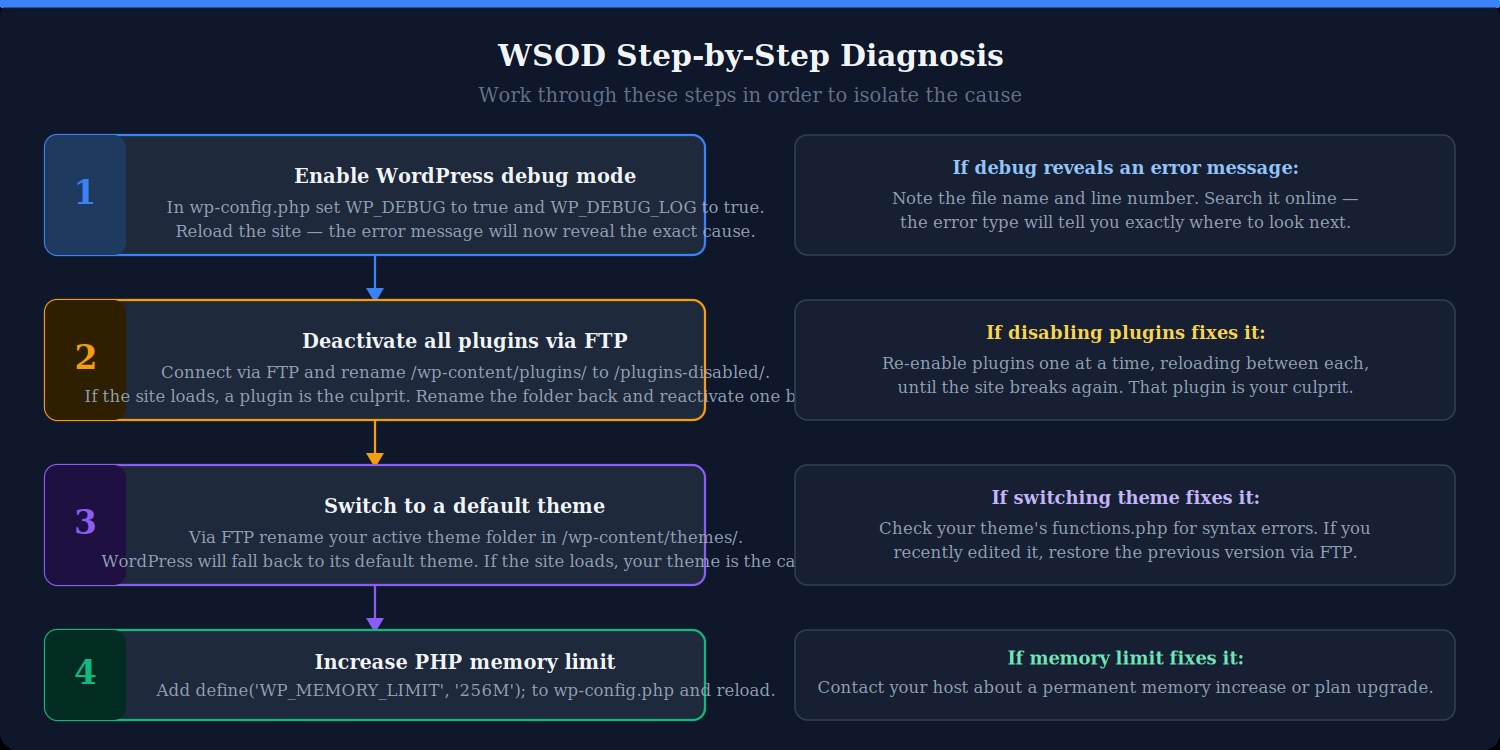
Step 1: Enable WordPress debug mode
The first and most important step is to turn on WordPress’s built-in error reporting. By default, PHP errors are hidden from the browser. Enabling debug mode tells WordPress to display them, which will usually reveal the exact file, line number, and error type causing the crash.
Connect to your server via FTP or your hosting file manager and open wp-config.php in the root of your WordPress installation. Find this line:
define( 'WP_DEBUG', false );Change it to:
define( 'WP_DEBUG', true );
define( 'WP_DEBUG_LOG', true );
define( 'WP_DEBUG_DISPLAY', true );
Save the file and reload your site in the browser. One of two things will happen: the error message will now appear on the white screen, telling you exactly what went wrong, or the errors will be written to a log file at wp-content/debug.log which you can open via FTP.
Read the error message carefully. It will usually name the plugin or theme file responsible and the line number of the problem. This alone will point you to the fix in most cases.
Important: always set WP_DEBUG back to false once you have fixed the problem. Leaving debug mode active on a live site displays sensitive information to visitors.
Step 2: Deactivate all plugins via FTP
If the error message is unclear or you cannot identify the specific plugin from the log, the next step is to deactivate all plugins at once. You cannot use the WordPress admin for this if the dashboard itself is blank, so you need to do it via FTP.
Connect to your server via FTP and navigate to wp-content/. Find the folder named plugins and rename it to something like plugins-disabled. WordPress will no longer be able to find or load any plugins.
Reload your site. If it comes back, a plugin was the cause. Rename the folder back to plugins and then reactivate plugins one at a time through the WordPress admin, reloading after each activation, until the WSOD returns. The last plugin you activated is your culprit.
Once identified, either delete the problematic plugin or leave it deactivated and check for an updated version from its developer.
Step 3: Switch to a default WordPress theme
If disabling all plugins does not resolve the WSOD, the theme is the next suspect. Via FTP, navigate to wp-content/themes/ and rename your active theme’s folder — for example rename my-theme to my-theme-disabled. WordPress will automatically fall back to its most recently installed default theme (Twenty Twenty-Four or similar).
Reload the site. If it loads with the default theme, your theme was causing the crash. The most common culprit is an error in the theme’s functions.php file, particularly if you recently made manual edits. Open functions.php via FTP, look for syntax errors — unclosed brackets, missing semicolons, or a function call referencing something that no longer exists — and correct them.
If you used a child theme and added custom code, that code in the child theme’s functions.php is often the cause. Try removing recent additions first.
Step 4: Increase the PHP memory limit
If both the plugin and theme tests come back clean, PHP memory exhaustion may be the issue. Open wp-config.php via FTP and add this line above the line that reads “That’s all, stop editing!”:
define( 'WP_MEMORY_LIMIT', '256M' );Save the file and reload the site. If it comes back, your original memory limit was too low for the demands of your site. Contact your hosting provider to discuss a permanent increase — some hosts can raise the PHP memory limit from their control panel without requiring a plan upgrade.
You can also try adding or editing this line in your .htaccess file:
php_value memory_limit 256MNote that this only works on Apache servers. On Nginx or managed hosting environments, the memory limit is set server-side by your host.
Step 5: Reinstall WordPress core files
If none of the above resolves the issue, a corrupted core file may be responsible. Download a fresh copy of WordPress from wordpress.org — make sure it matches your current version. Extract the zip file and upload everything except the wp-content folder and the wp-config.php file, as those contain your site data and settings. Overwriting the core files with clean copies will fix any corruption without affecting your content.
In the WordPress admin (if accessible), you can also trigger a core reinstall by going to Dashboard → Updates and clicking “Re-install version X.X.X”.
Step 6: Check and fix file permissions
If the site is still blank after all of the above, check your file permissions via FTP. In your FTP client, right-click a file or folder to view and edit permissions. The correct permissions for a WordPress site are:
- Directories:
755 - Files:
644 - wp-config.php:
440or400
Via SSH, you can reset permissions across your entire installation with these commands:
find /path/to/wordpress/ -type d -exec chmod 755 {} \;
find /path/to/wordpress/ -type f -exec chmod 644 {} \;
Replace /path/to/wordpress/ with the actual path to your WordPress installation on the server.
If None of These Steps Work: Restore From a Backup
If you have worked through every step above and the site is still blank, restoring from a clean backup is the most reliable path to recovery. This is why having daily automated backups is so important — without one, you may be facing a full site rebuild.
If your host provides automated backups (SiteGround, WP Engine, Kinsta, and most managed WordPress hosts do), log into your hosting control panel and look for a backup restore option. Restore to the most recent backup taken before the WSOD appeared.
If you use a plugin like UpdraftPlus, Jetpack, or BlogVault, use its restore function to roll back to a clean state.
After restoring, do not simply re-apply the update or change that caused the crash. Identify what went wrong first — use your staging environment to reproduce and fix the issue safely before deploying to the live site again.
How to Prevent the White Screen of Death
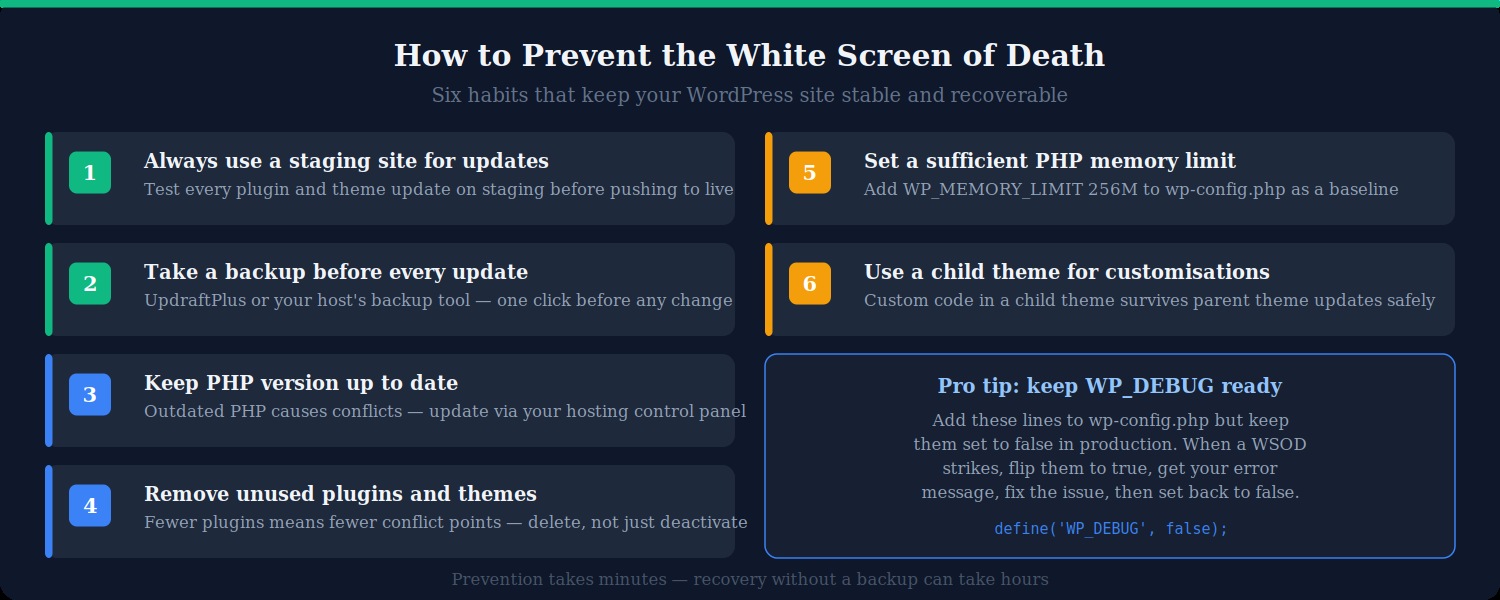
Always use a staging environment for updates
The WSOD most commonly strikes immediately after an update. Testing every plugin, theme, and core update on a staging site before applying it to your live site is the single most effective prevention measure. Most managed WordPress hosts provide one-click staging environments. If yours does not, plugins like WP Staging can create a local copy of your site for testing.
Take a backup before every update
Even with a staging site, always take a fresh backup of your live site immediately before applying any update. If something goes wrong, a one-click restore is far faster than working through the diagnostic steps above. Make this an non-negotiable part of your update workflow.
Keep PHP up to date
Running an outdated version of PHP increases the risk of conflicts and crashes. WordPress recommends PHP 8.1 or higher. Check your current PHP version in your hosting control panel and upgrade if necessary — most hosts allow this with a single click and it will not affect your site content.
Remove unused plugins and themes
Every inactive plugin and theme is an additional conflict point and a potential security risk. After deactivating anything you no longer use, delete it entirely rather than leaving it inactive. A leaner installation is a more stable one.
Use a child theme for customisations
Never edit your parent theme files directly. If you update the parent theme, your edits will be overwritten. A child theme inherits all the parent theme’s styling and functionality but keeps your customisations in a separate set of files that survive parent theme updates untouched.
Set a baseline PHP memory limit
Do not wait for a memory exhaustion WSOD to raise your PHP memory limit. Adding define( 'WP_MEMORY_LIMIT', '256M' ); to wp-config.php proactively gives WordPress sufficient headroom for most plugin combinations and traffic levels.
Keep WP_DEBUG configured but inactive
Add the debug configuration lines to your wp-config.php now, with WP_DEBUG set to false. When a WSOD strikes, all you need to do is flip it to true to see the error immediately — saving the time it takes to locate and edit the file under pressure.
Summary
The WordPress White Screen of Death looks catastrophic but is almost always fixable within minutes once you know the right steps to take. Enable debug mode first to get the actual error message — this will resolve the majority of cases immediately. If the error is unclear, work through plugin deactivation, theme switching, memory limit increase, and core file reinstall in order. Keep a backup available at all times so that in the worst case, you have a reliable rollback option rather than a rebuild ahead of you.
Building the right habits — staging environments, pre-update backups, a child theme for custom code, and a well-configured wp-config.php — turns the WSOD from a recurring nightmare into a rare and quickly resolved inconvenience.

